Module Creation
Creating a Module
After modifying the Main VI, the next steps are to create new modules and insert existing ones. When designing the program, you should aim to ensure that the modules you create implement clearly distinct functions. When specifying modules, you should take into account the need to make it as easy as possible to reuse a given function in another project.
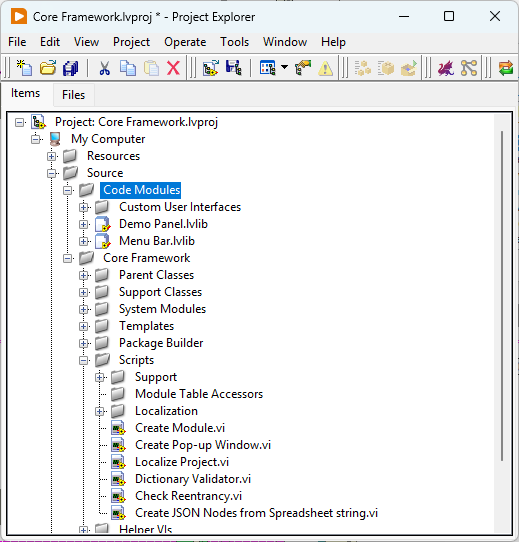
Step 1. Locate the Module Creator VI
To create a new module, use the Create Module VI script VI.
- Menu Bar.lvlib
- Demo Panel.lvlib
- CORE Test Panel.lvlib
- Create Module.vi
- Create Pop-up Window.vi
- Localize Project.vi
- Dictionary Validator.vi
- Check Reentrancy.vi
- Create JSON Nodes from Spreadsheet string.vi
Step 2. Specify the new module location
After opening the Create Module VI in the project, click on the virtual folder where you want to place the new module. Modules are created in the Code Modules folder by default, but you can introduce additional hierarchy within this folder if necessary. Do not use a hierarchy deeper than two levels within Code Modules.
After selecting the location for the new module in the project structure, run the Create Module VI CTRL + R.
Step 3. Specify the new module properties
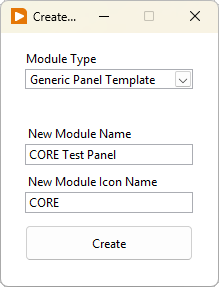
Before creating the module, you must specify the type of template you want to use, the name of the new module, and the text to be displayed above the VI icons. Currently, there are three templates to choose from.
Generic Module Template
Suitable for modules for which you do not want to create a user interface.
Generic Panel Template
Suitable for modules for which you do want a user interface.
Instrument Template
Suitable for modules that will implement the control of some kind of instrument
For our demo module use the following values:
- Module Type: Generic Panel Template. You can use any of the templates mentioned above.
- New Module Name: CORE Test Panel. In the Name field, enter words separated by spaces, with the first word capitalized, and keep the name under 25 characters if possible.
- New Module Icon Name: CORE. You can enter a 5-character text for the icon name. This is limited because more than 5 characters will not appear on the icon.
Step 4. Execute module creation
After clicking the Create button, a window pops up where you
can specify which folder on the hard drive the new module should be placed in. It is recommended to match the
hierarchy used in the project structure within the Code Modules directory. After selecting the folder,
the program begins copying the template and renaming the necessary parts. When the process is complete,
save the changes using the Save All Ctrl+Shift+S function in the project explorer, or if you only want to save the new
module, right-click on the new module’s lvlib section in the project structure and select Save/Save All (this Library).
Adding existing modules to the project (optional)
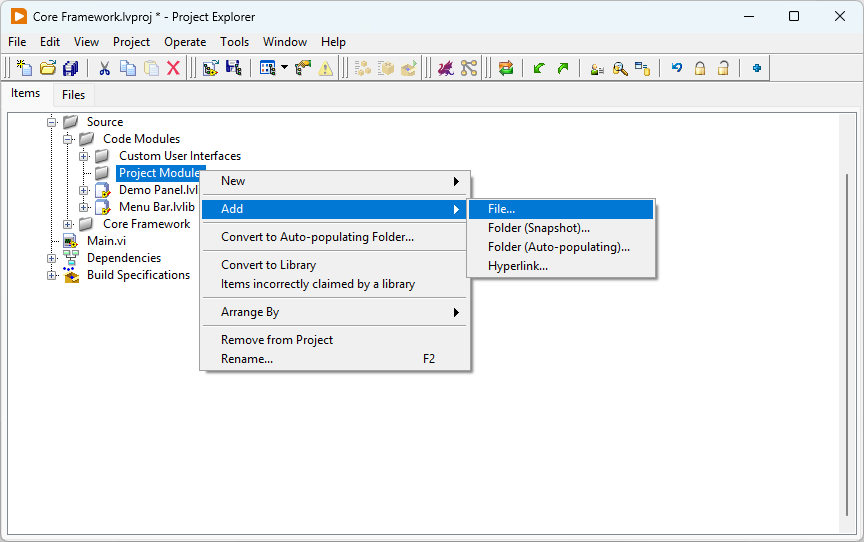
It is possible to use existing modules in a project. To do this, copy the selected module’s directory to
the appropriate location in the new project’s Code Modules folder, then right-click on the virtual folder
in the project structure where you want to insert the module. In the menu, select the Add/File… function.
In the window that appears, locate the .lvlib file in the copied module directory, select it, and click the Add File button.
Implement module functionality
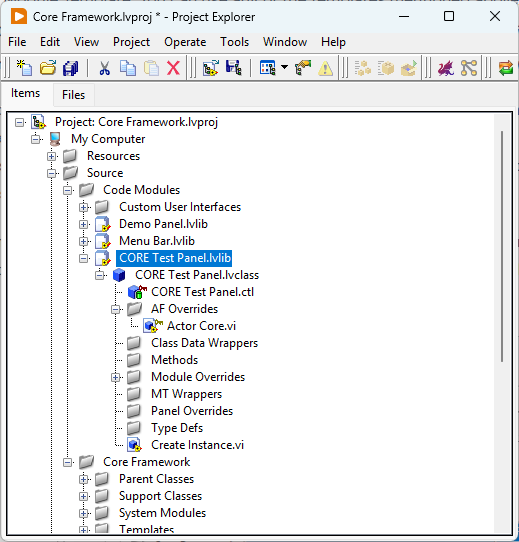
Following the steps described in the previous chapter, we have created the CORE Test Panel module. In the following, we will walk through the implementation of a few basic features. In the example discussed, we created a Panel, and the script generated the following folder structure:
- CORE Test Panel.ctl
- Actor Core.vi
- Create Instance.vi
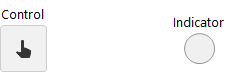
With only a switch action button and a boolean indicator, some main features of the Framework can still be presented.
So now the Front Panel of the CORE Test Panel’s Actor Core.vi looks like the following:
The purpose of this example is to introduce you to Module Commands, Module Table variables, and the mechanism for subscribing to them, using the example of turning on an LED with a single button press.
Step 1. Generate Module Command
The Panel class contains two dedicated, parallel loops: the UI Loop and the Main Loop. One of the main reasons for this separation is to prevent the user interface from freezing while a process that requires significant computational resources is being executed. You can use any other design patterns, however we are strongly recommending using separated UI and Logic threads.
Communication between the loops is possible using Module Commands. In our case, we will send the current value of the boolean-type Control with the help of the Set Indicator command to the Main Loop in response to the Control button’s value-change event.
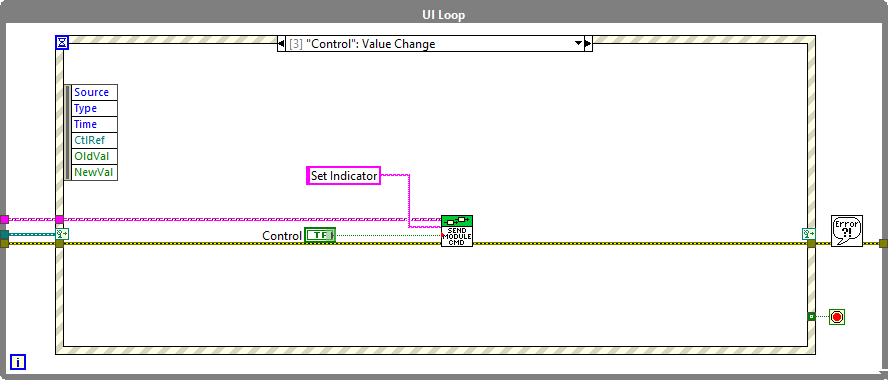
- Open the block diagram of the new module Core
CORE Test Panel > AF Overrides > Actor Core.vi. - Drop a boolean control with switch action to this VI.
- Add a new value change Event Case for this control in the UI Loop User Event case.
- Add a
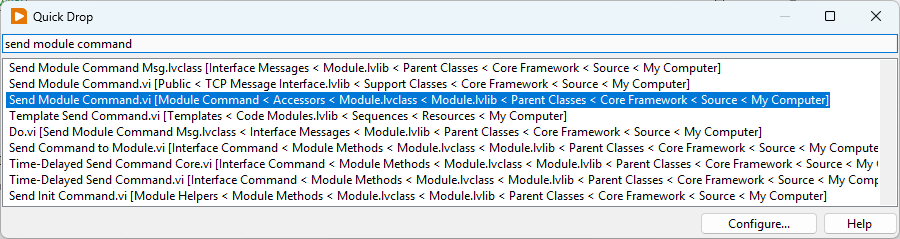
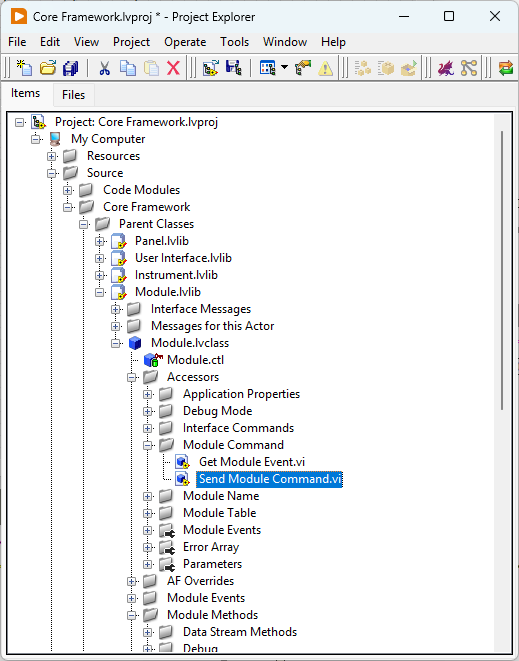
Send Module Command.vifunction to this event. Use the quick drop function or locate in the project (see images below).- Command: “Set Indicator” string
- Parameters: The value of the control.
Step 2. Handle Module Command
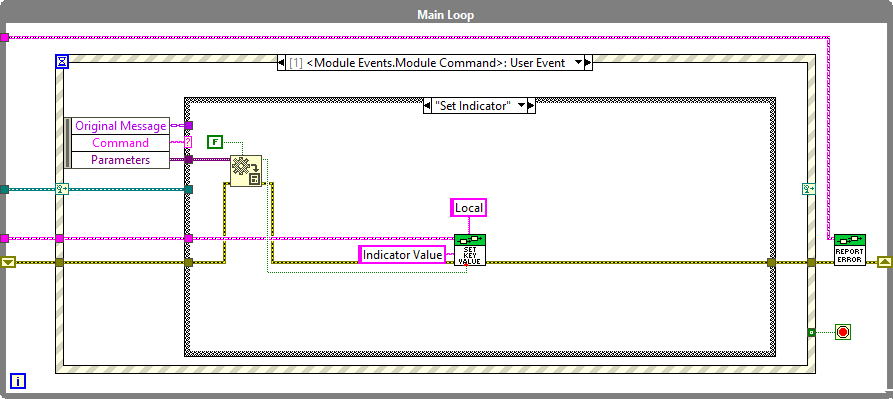
On the receiving side — which is the Main Loop — you need to decide what should happen in response to the command. In this specific case, the parameter value is entered into the Module Table.
- Create a new Case within the
Module Events.Module CommandUser Event. The Case value should match with the Command Name Set Indicator. - Use a
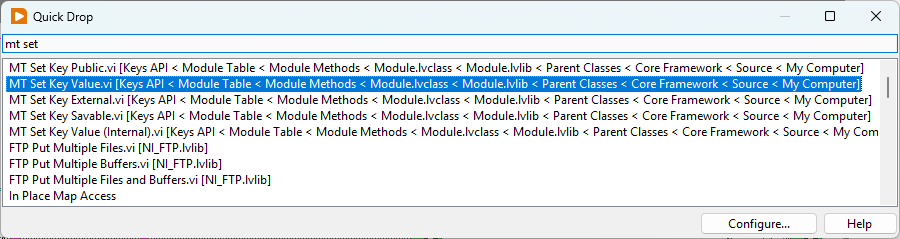
Variant to DataVI to get the Boolean value of the Parameter Variant. - Drop a MT Set Key Value.vi to this case. It is accessible from the
Core Framework > Parent Classes > Module.lvlib > Module.lvclass > Module Methods > Module Table > Keys APIfolder, or from the quick drop list. - Connect the required inputs:
- Group: “Local” string. The group of the variable. Local group variables are internally handled ones.
- Key in: “Indicator Value”. The name of the variable.
- Value: The Parameter comming from the command.
Step 3. Subscribe to Module Table Variable Update
Local vairables are automatically broacasted within a module. So to handle variable value changes, you should add the following case to the UI Loop. Be carefull in the case hiearchy.
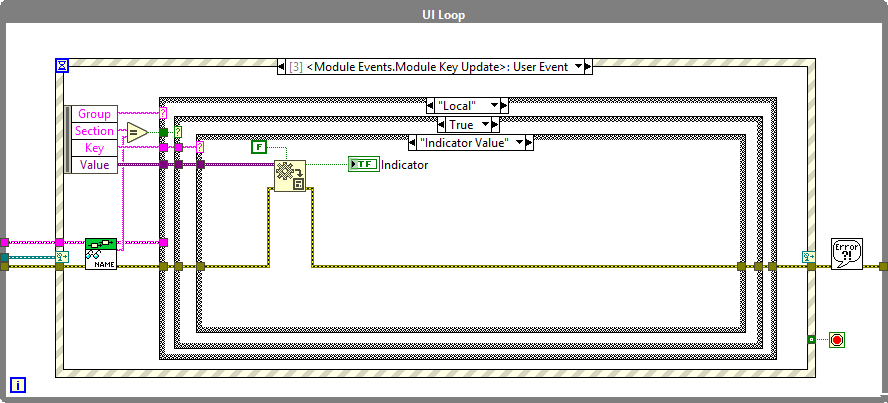
This was a quite easy task solved in a bit complex way, but we hope you have understood the key principles through this example. In a real life application you may add further complexity to this loop so the implementation makes more sense.
Instance Creation
To run the module you’ve created, you need to instantiate it within the Main VI. Simply place an instance of this module
and add it to the array that holds the modules. If you don’t want the module to be created with the default name,
you can override it using Module Overrides\Set Module Name.vi.
- Drop the new class object to the Main.vi ´CORE Test Panel.lvlib > CORE Test Panel.lvclass´
- Wire this class object to the Build Array element, already placed in the Main.vi
- In order to be able to bring up the created module while running, you must place it in the appropriate
location within the parameter array of the Menu Bar
Init Buttons.vifunction used for navigation, as shown earlier:
The Module Name has to exactly match with the name given to the module (defined during the creation, stored in the Module Overrides\Set Module Name.vi). The Label can be arbritrary.
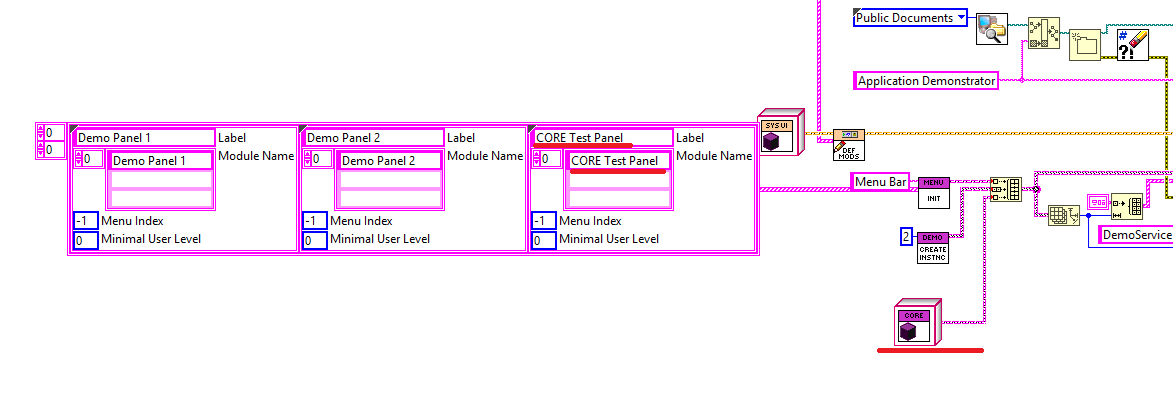
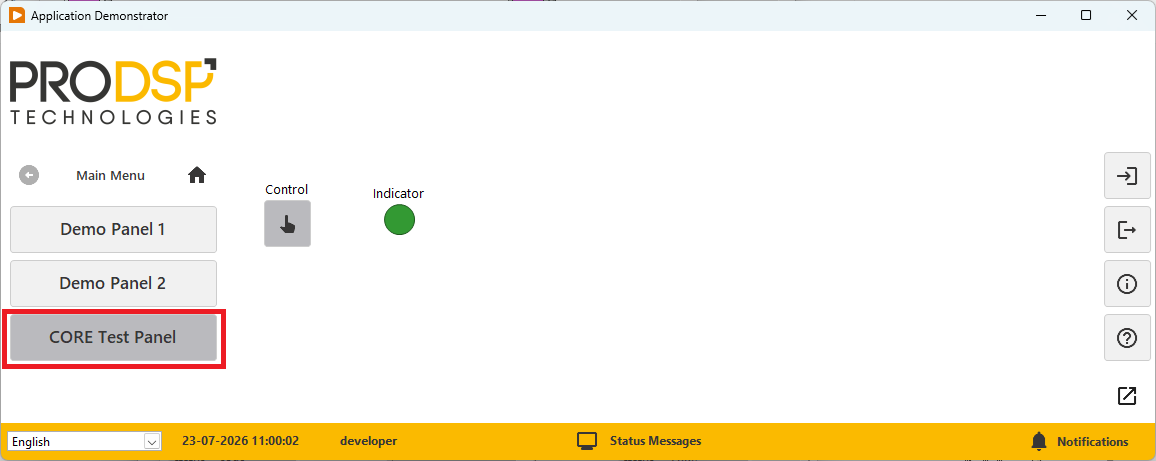
Now you can run the Main VI and you will see your module in the Menu Bar.